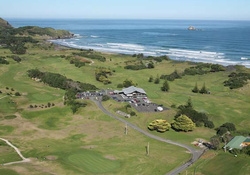
MURIWAI GOLF CLUB
Coast Road
Muriwai Auckland Phone:(09) 411 8454 Email:[email protected] Website:www.muriwaigolfclub.co.nz |
|

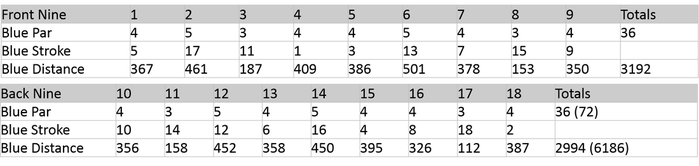
MEN BLUE
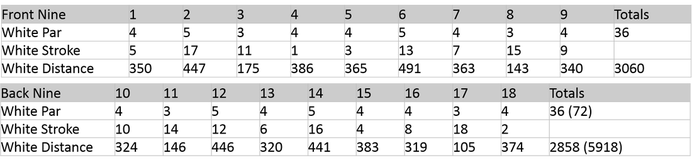
MEN WHITE
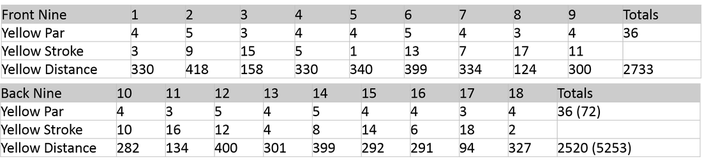
WOMAN YELLOW
course layout
FRONT 9
HOLE 1
Par 4 - "The Māra"
- A challenging opening hole with a slight dogleg to the right.
- Aim your tee shot towards the left side of the fairway to avoid the fairway bunkers on the right.
- The green is well-guarded by bunkers, so accuracy is crucial on the approach shot.
HOLE 2
Par 3 - "The Kōtare"
- A picturesque par 3 with a large green.
- Select the appropriate club to carry any hazards and hit the green.
- Pay attention to the wind, as it can influence your shot.
HOLE 3
Par 4 - "The Kauri"
- A straightaway par 4 with a wide fairway.
- Favor the left side of the fairway to have a better angle for the approach shot.
- The green is protected by bunkers, so accuracy is important.
hole 4
Par 5 - "The Makarā"
- A challenging par 5 with a slight dogleg to the left.
- Play your tee shot down the middle of the fairway, avoiding any fairway bunkers.
- The second shot requires careful placement to avoid hazards and set up a manageable approach.
- The green is well-guarded and demands precision.
hole 5
Par 4 - "The Takahē"
- A challenging par 4 with a slight dogleg to the right.
- Aim towards the left side of the fairway to avoid the fairway bunkers on the right.
- The approach shot demands accuracy to a green protected by bunkers.
hole 6
Par 3 - "The Tūī"
- A beautiful par 3 with a green nestled among natural surroundings.
- Choose the right club to carry any hazards and hit the green.
- Consider wind conditions, as they can affect your shot.
hole 7
Par 5 - "The Ruru"
- A scenic par 5 with strategic bunkering.
- Play your tee shot down the middle of the fairway, avoiding any fairway bunkers.
- The second shot requires careful placement to navigate around hazards and set up a manageable approach.
- The green is elevated and well-guarded, requiring accuracy.
hole 8
Par 4 - "The Kārearea"
- A challenging par 4 with a slight dogleg to the left.
- Aim towards the right side of the fairway to have a clear approach to the green.
- The green is protected by bunkers, so precision is necessary.
hole 9
Par 4 - "The Wharauroa"
- A challenging finishing hole with a slight dogleg to the right.
- Aim towards the left side of the fairway to avoid the fairway bunkers on the right.
- The green is well-guarded and demands accuracy on the approach shot.
BACK 9
HOLE 10
Par 4 - "The Kōwhai"
- A challenging starting hole for the back 9.
- A straightaway par 4 with bunkers strategically placed.
- Aim for the center of the fairway off the tee.
- The approach shot requires precision to a green protected by bunkers.
HOLE 11
Par 3 - "The Pūkeko"
- A picturesque par 3 with natural surroundings.
- Select the appropriate club to carry any hazards and hit the green.
- Be mindful of wind conditions, as they can impact your shot.
Hole 12
Par 4 - "The Kākā"
- A dogleg par 4 with a slight bend to the right.
- Aim towards the left side of the fairway to have a clear approach to the green.
- The green is protected by bunkers, so accuracy is important.
HOLE 13
Par 5 - "The Kea"
- A challenging par 5 with strategic bunkering.
- Play your tee shot down the middle of the fairway, avoiding any fairway bunkers.
- The second shot requires careful placement to navigate around hazards and set up a manageable approach.
- The green is well-guarded and demands precision.
HOLE 14
Par 4 - "The Tūī"
- A challenging par 4 with a slight dogleg to the left.
- Aim towards the right side of the fairway to have a clear approach to the green.
- The approach shot demands accuracy to a green protected by bunkers.
HOLE 15
Par 3 - "The Pīwakawaka"
- A picturesque par 3 with a challenging green complex.
- Choose the right club to carry any hazards and hit the green.
- Pay attention to wind conditions, as they can affect your shot.
hole 16
Par 4 - "The Kārearea"
- A challenging par 4 with a slight dogleg to the left.
- Aim towards the right side of the fairway to have a clear approach to the green.
- The green is protected by bunkers, so accuracy is necessary.
hole 17
Par 5 - "The Kotuku"
- A scenic par 5 with strategic bunkering.
- Play your tee shot down the middle of the fairway, avoiding any fairway bunkers.
- The second shot requires careful placement to navigate around hazards and set up a manageable approach.
- The green is elevated and well-guarded, requiring accuracy.
hole 18
Par 4 - "The Mātātā"
- A challenging finishing hole with a slight dogleg to the right.
- Aim towards the left side of the fairway to avoid the fairway bunkers on the right.
- The green is well-guarded and demands accuracy on the approach shot.
Please note that the descriptions provided are a general guide, and the actual playing conditions may vary. It's always recommended to consult the course map and seek advice from local staff for the most accurate and up-to-date information before playing.