HELENSVILLE GOLF CLUB
197 Peak Road
Helensville Auckland 0875 Phone:(09) 420 5454 Email:helensville@golf.co.nz Website:www.helensvillegolf.co.nz |
|
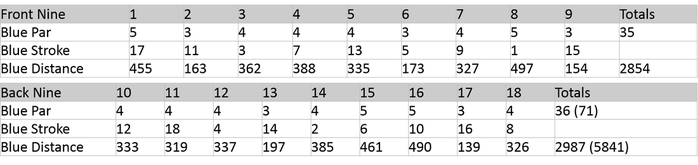
MEN BLUE
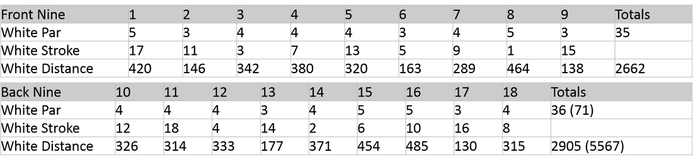
MEN WHITE
WOMAN YELLOW
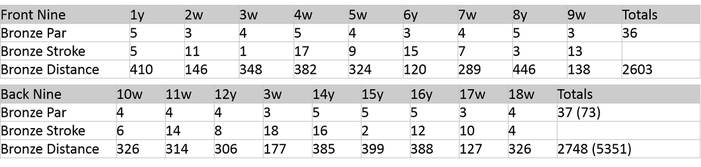
course layout
FRONT 9
HOLE 1 (par 5)
A short par 5 is always a good way to start. Although not long, watch the out of bounds on the left, and the trees on the right, but a good drive will get you to the corner of the slight dogleg left. A straight second will get you close to or on the level green.
HOLE 2 (par 3)
This is a challenging par 3 with two bunkers flanking the front of the green and one at the right rear. The narrow, but wide green slopes right to left - a careful putt required here.
HOLE 3 (par 4)
The first par 4 needs a drive up the slight rise to a flat plateau for your second. There are two bunkers to the right of the green to be aware of. The undulating green can test your skill.
hole 4 (par 4)
The 4th goes away from the clubhouse with the landing area sloping left to right. The ideal shot is left of centre to give you a level stance. With a lateral hazard to the right and out of bounds at the back of the green, you need to be careful with your second. Another undulating green with subtle borrow provides a rewarding par.
hole 5 (par 4)
A relatively short hole for a wide fairway awaiting a good tee shot. The water on the right of the tee can surprise. There is out of bounds on the left with trees on the right. The green, while relatively flat, does slope severely on the left quarter.
hole 6 (par 3)
This is the signature hole at HDGC. A classic hole over water with a severe bank penalizing a wide shot left. A bunker catches anything right. A two level green provides interesting putting.
hole 7 (par 4)
A challenging short hole with out of bounds all the way up on the left, and trees on the right. The small green has a drop off on the LHS and front RHS. A par is a good result here.
hole 8 (par 5)
This par 5 has out of bounds on the LHS for the length of the hole. Your second shot will be played from a slightly sloping right to left fairway. There is a gully about 60 metres in front of the green, leaving you with an uphill approach to an undulating green. Watch out for the bunker in front of the green put there to catch any short shot.
hole 9 (par 3)
This par 3 ends the front 9, and plays away from the clubhouse. The 3 bunkers in front of and to the sides can make this a difficult green to hit. A fairly flat green with subtle breaks can be a challenge, especially when the pin is RHS back.
BACK 9
HOLE 10 (par 4)
This short par 4 has a shallow bunker to the right of the green. A good drive will leave a mid to short iron to the green.
HOLE 11 (par 4)
This runs parallel to the 10th but in the opposite direction. Whilst it is not long, the green is not visible from the tee. Anything finishing up on the fairway will allow your mid to short iron to find the flat green. No real surprises here.
Hole 12 (par 4)
An interesting dogleg right hole with a right to left sloping fairway. Hit it too far and you will end up in the lake at the end of the fairway. Hit it too short and you will not be able to see the green which is protected by a bunker on the RHS, and water short on the left. This is another green that looks flat, but has subtle breaks.
HOLE 13 (par 3)
This is the longest par 3 we have. A long iron or fairway wood is required to reach the largest green on the course. It has a deceptively flat putting surface.
HOLE 14 (par 4)
This is a long par 4 with water on the left which will catch a wayward drive. Your second will be played from a sloping fairway to a green that slopes slightly back to front.
HOLE 15 (par 5)
This is the 3rd of the par5's with a slight dogleg left to right. There are trees short and right which must be avoided if you want your par. The next shots will be played from level ground to a green faced by 2 bunkers. There is a dip in front of the green with water hazards well to the left and right.
hole 16 (par 5)
This straight forward par 5 is in the middle of the course and provides a wide fairway for a flat second shot. The 2 fairway bunkers about 90 and 60 metres from the green on the RHS can come into play with your second shot. The green is the flattest on the course. Have fun reading the breaks!
hole 17 (par 3)
An interesting par 3 with a lateral hazard
to the left of the fairway and a water hazards to the left and right of this
kidney shaped green. Reading the subtle borrows will be rewarding.
hole 18 (par 4)
This hole leads back to the clubhouse. Be aware of the bunker on the RHS of the fairway about 135 metres from the green. A flat lie for your second should enable a putt for your third. This green slopes from back to front and can be a challenge in the wind.